1、Scrapy概述
当我们写了很多个爬虫程序之后,你会发现每次写爬虫程序时,都需要将页面获取、页面解析、爬虫调度、异常处理、反爬应对这些代码从头至尾实现一遍,这里面有很多工作其实都是简单乏味的重复劳动。
那么,有没有什么办法可以提升我们编写爬虫代码的效率呢?答案是肯定的,那就是利用爬虫框架,而在所有的爬虫框架中,Scrapy 应该是最流行、最强大的框架
1.1 框架
把所有的操作都封装完成,只需要把请求地址及其解析数据的格式给到即可,而框架的封装一般都是将共性的东西,比如发动请求,接受响应,设置请求头等,但是,请求地址,解析数据的内容,不同的网站是不一样的,则需要自己实现
1.2 Scrapy
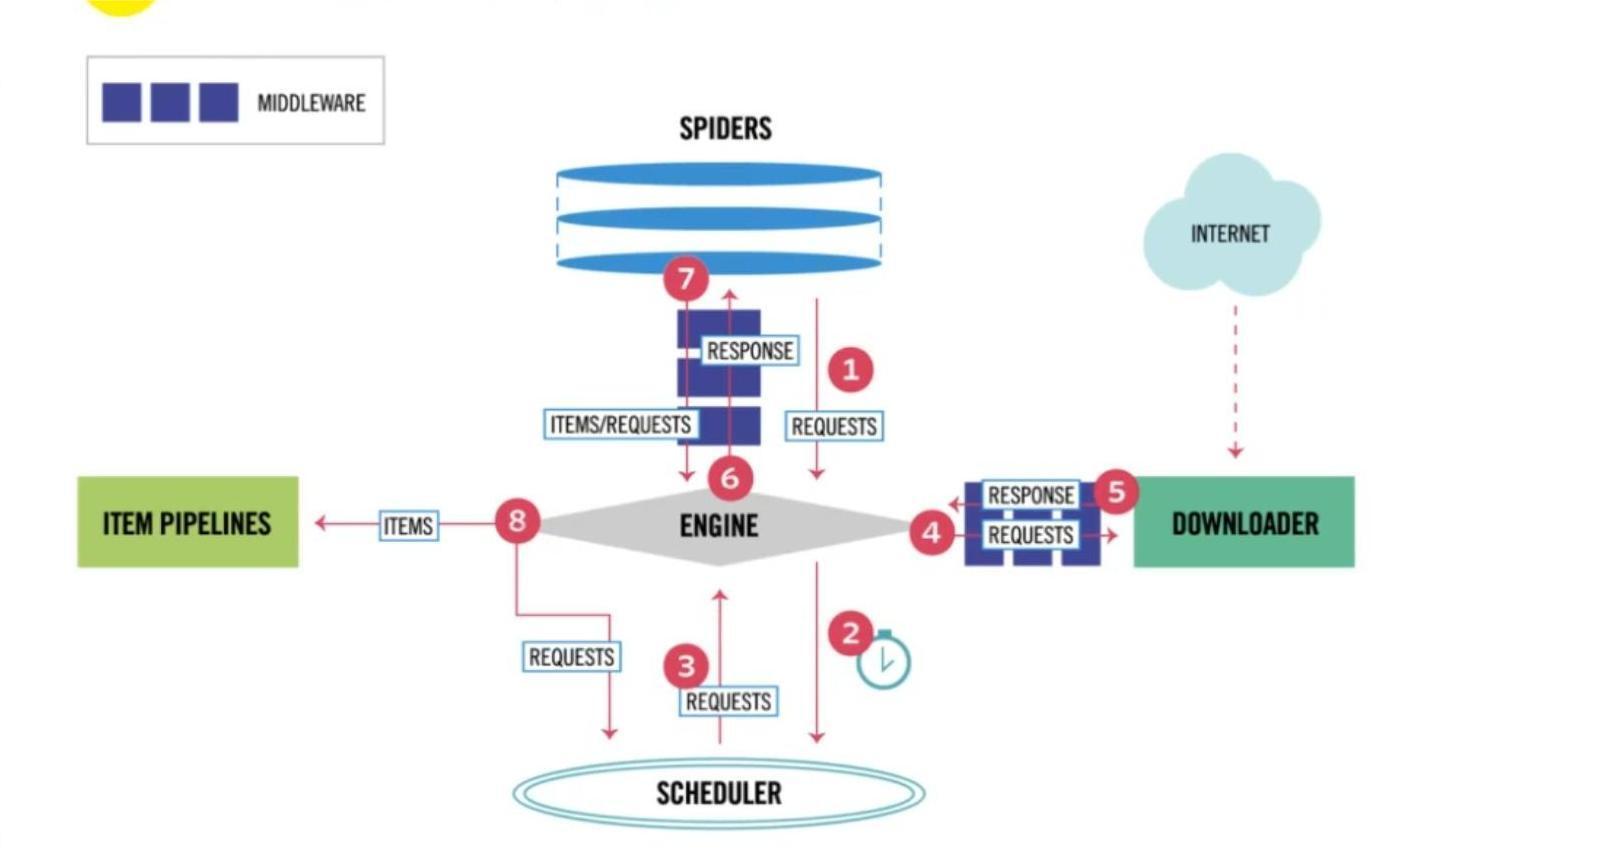
Scrapy 是基于 Python 的一个非常流行的网络爬虫框架,可以用来抓取 Web 站点并从页面中提取结构化的数据。 下图展示了 Scrapy 的基本架构,其中包含了主要组件和系统的数据处理流程(图中带数字的红色箭头)。包括引擎,调度程序,蜘蛛程序,下载器,管道处理器,中间件等
1.3 Scrapy中的组件
-
Scrapy引擎(Engine):用来控制整个系统的数据处理流程。
-
调度器(Scheduler):调度器从引擎接受请求并排序列入队列,并在引擎发出请求后返还给它们。
-
下载器(Downloader):下载器的主要职责是抓取网⻚并将网页内容返还给蜘蛛(Spiders)。
-
蜘蛛程序(Spiders):蜘蛛是用户自定义的用来解析网页并抓取特定URL的类,每个蜘蛛都能处理一个域名, 或一组域名,简单的说就是用来定义特定网站的抓取和解析规则的模块。
-
数据管道(Item Pipeline):管道的主要责任是负责处理有蜘蛛从网页中抽取的数据条目,它的主要任务是清理、验证和存储数据。当页面被蜘蛛解析后,将被发送到数据管道,并经过几个特定的次序处理数据。每个数据管道组件都是一个 Python 类,它们获取了数据条目并执行对数据条目进行处理的方法,同时还需要确定是否需要在数据管道中继续执行下一步或是直接丢弃掉不处理。数据管道通常执行的任务有:清理 HTML数据、 验证解析到的数据(检查条目是否包含必要的字段)、检查是不是重复数据(如果重复就丢弃)、将解析到的数据存储到数据库(关系型数据库或 NoSQL 数据库)中。
-
中间件(Middle wares):中间件是介于引擎和其他组件之间的一个钩子框架,主要是为了提供自定义的代码来拓展 Scrapy 的功能,包括下载器中间件和蜘蛛中间件,拦截处理请求和响应
1.4 Scrapy的流程步骤
Scrapy 的整个数据处理流程由引擎进行控制,通常的运转流程包括以下的步骤:
- 引擎询问蜘蛛需要处理哪个网站,并让蜘蛛将第一个需要处理的URL交给它。
- 引擎让调度器将需要处理的URL放在队列中。
- 引擎从调度那获取接下来进行爬取的页面。
- 调度将下一个爬取的URL返回给引擎,引擎将它通过下载中间件发送到下载器。
- 当网页被下载器下载完成以后,响应内容通过下载中间件被发送到引擎;如果下载失败了,引擎会通知调度器记录这个 URL,待会再重新下载。
- 引擎收到下载器的响应并将它通过蜘蛛中间件发送到蜘蛛进行处理。
- 蜘蛛处理响应并返回爬取到的数据条目,此外还要将需要跟进的新的URL发送给引擎。
- 引擎将抓取到的数据条目送入数据管道,把新的URL发送给调度器放入队列中。
上述操作中的第2步到第8步会一直重复直到调度器中没有需要请求的 URL,爬虫就停止工作
2、环境配置及项目创建
2.1 安装Scrapy
Scrapy是一个第三方库,可以使用 Python 的包管理工具 pip 来安装 Scrapy
- Windows
pip install scrapy- Mac/Linux
pip3 install scrapy2.2 创建项目流程
-
打开要存放项目的文件夹,选中文件夹路径,输入cmd启动命令提示符
D:\WorkSpace\ScrapyDemo -
在我们要作为项目目录的路径下,在cmd中使用scrapy创建名为XXX的项目
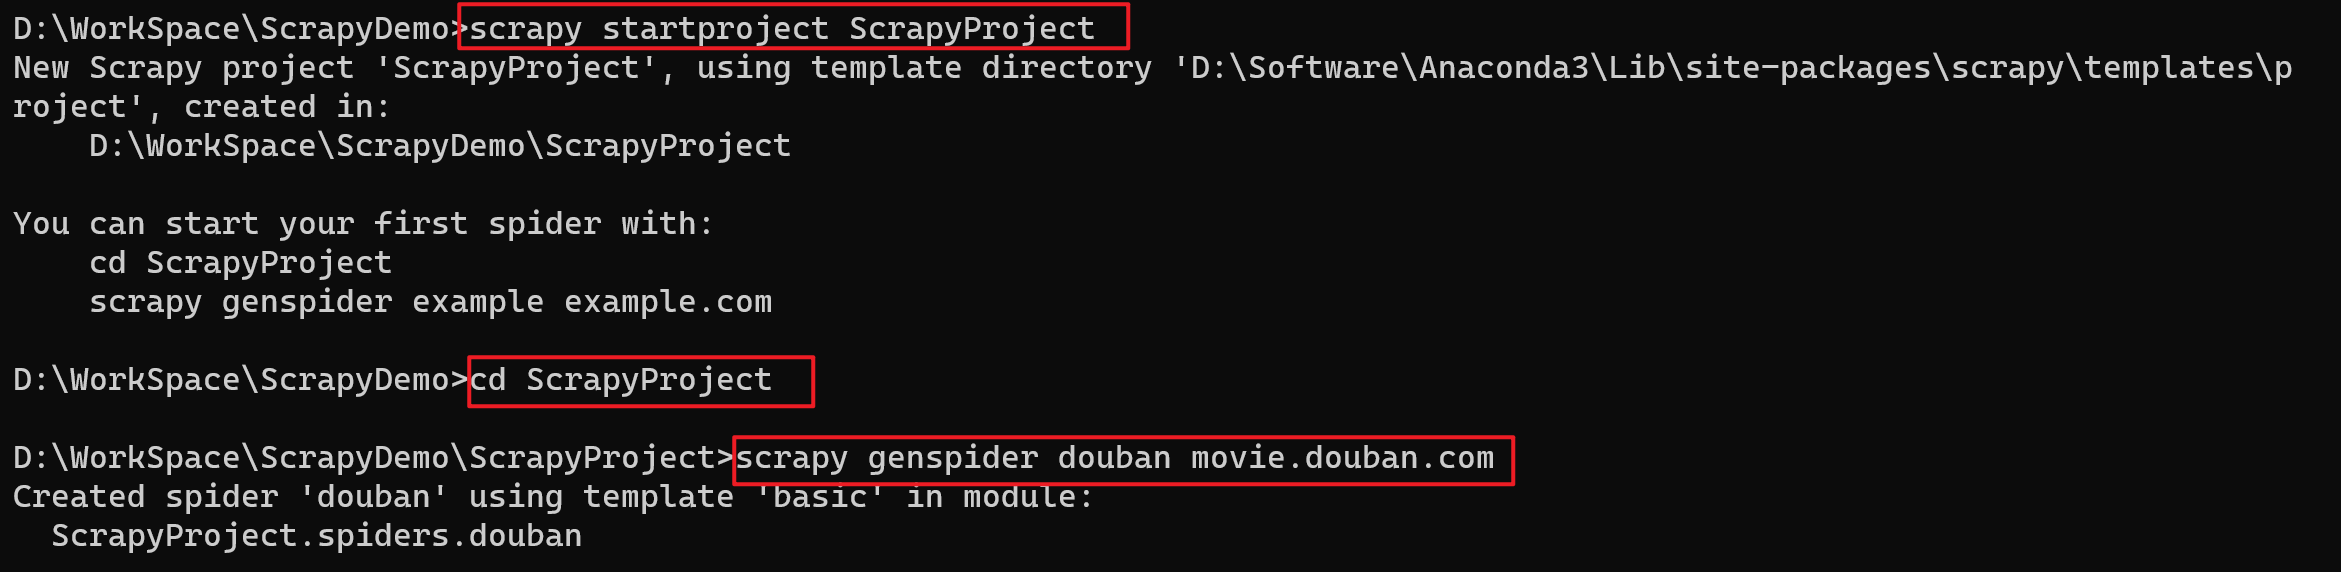
比如:创建名为ScrapyProject的项目
scrapy startproject ScrapyProject
- 命令运行后,会自动生成一下文件,我们可以查看文件结构
tree /f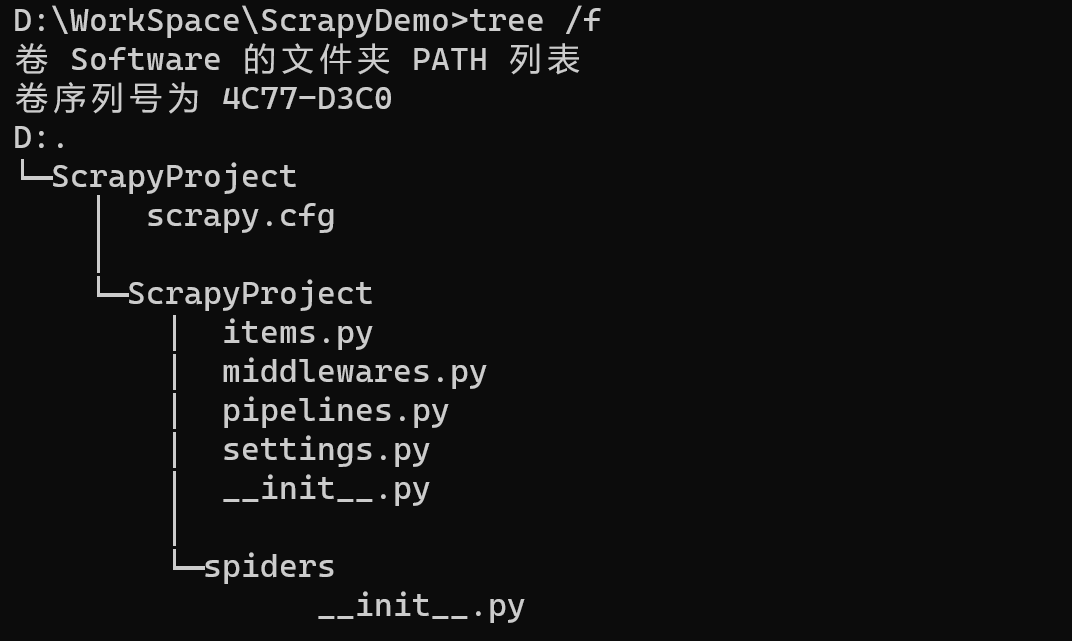
- 文件作用说明
ScrapyProject # 项目名 |————scrapy.cfg # 项目的配置文件 |————ScrapyProject # 项目名同名的包名 |————items.py # 定义要解析的数据对应的字段 |————middlewares.py # 中间件文件,爬虫中间件和下载中间件 |————pipelines.py # 项目的管道文件 |————settings.py # 项目的设置文件 |————__init__.py # |————spiders # |————__init__.py # -
切换到XXX目录,然后创建名为xxx的蜘蛛程序,指定可访问的域名
cd  XXX
scrapy genspider 程序名  允许请求的域名
比如:切换到ScrapyProject目录,然后创建
douban的蜘蛛程序,并且制定可访问的域名为movie.douban.comcd ScrapyProject scrapy genspider douban movie.douban.com
-
用PyCharm打开项目
2.2.1 完整流程
3、蜘蛛程序文件介绍
这里对settings.py做一个简单介绍
...
...
...

# Crawl responsibly by identifying yourself (and your website) on the user-agent
用户代理是什么
#USER_AGENT = "ScrapyProject (+http://www.yourdomain.com)"

是否遵守robots协议
# Obey robots.txt rules
ROBOTSTXT_OBEY = True

同时发送请求的个数
# Configure maximum concurrent requests performed by Scrapy (default: 16)
#CONCURRENT_REQUESTS = 32

# Configure a delay for requests for the same website (default: 0)
# See https://docs.scrapy.org/en/latest/topics/settings.html#download-delay
# See also autothrottle settings and docs
设置下载的延时时间
#DOWNLOAD_DELAY = 3
# The download delay setting will honor only one of:
#CONCURRENT_REQUESTS_PER_DOMAIN = 16
#CONCURRENT_REQUESTS_PER_IP = 16

是否开启cookie
# Disable cookies (enabled by default)
#COOKIES_ENABLED = False

# Disable Telnet Console (enabled by default)
#TELNETCONSOLE_ENABLED = False

设置请求头
# Override the default request headers:
DEFAULT_REQUEST_HEADERS = {
# "Accept": "text/html,application/xhtml+xml,application/xml;q=0.9,*/*;q=0.8",
# "Accept-Language": "en",
'User-Agent':
'Mozilla/5.0 (Windows NT 10.0; Win64; x64) AppleWebKit/537.36 (KHTML, like Gecko) Chrome/119.0.0.0 Safari/537.36'
}

开启蜘蛛的中间件
# Enable or disable spider middlewares
# See https://docs.scrapy.org/en/latest/topics/spider-middleware.html
#SPIDER_MIDDLEWARES = {
#    "ScrapyProject.middlewares.ScrapyprojectSpiderMiddleware": 543,
#}

# Enable or disable downloader middlewares
# See https://docs.scrapy.org/en/latest/topics/downloader-middleware.html
#DOWNLOADER_MIDDLEWARES = {
#    "ScrapyProject.middlewares.ScrapyprojectDownloaderMiddleware": 543,
#}

# Enable or disable extensions
# See https://docs.scrapy.org/en/latest/topics/extensions.html
#EXTENSIONS = {
#    "scrapy.extensions.telnet.TelnetConsole": None,
#}

是否开启管道
# Configure item pipelines
# See https://docs.scrapy.org/en/latest/topics/item-pipeline.html
#ITEM_PIPELINES = {
#    "ScrapyProject.pipelines.ScrapyprojectPipeline": 300,
#}

...
...
...
4、Scrapy爬取豆瓣数据
4.1 书写程序
items.py
# Define here the models for your scraped items
#
# See documentation in:
# https://docs.scrapy.org/en/latest/topics/items.html

import scrapy

# 默认有个和工程名同名的类型,可以修改,注意:注意:该类一定要继承子scrapy.Item
class MovieItem(scrapy.Item):
    # define the fields for your item here like:
    # name = scrapy.Field()
    # 电影名称
    title = scrapy.Field()
    # 电影评分
    score = scrapy.Field()
douban.py
import scrapy
from scrapy.http import HtmlResponse
from ScrapyProject.items import MovieItem

class DoubanSpider(scrapy.Spider):
    # 蜘蛛程序的标记,不同的支柱程序,这个名称是不一样的
    name = "douban"
    # 允许请求的域名,要请求的域名都这设置在这里
    allowed_domains = ["movie.douban.com"]
    # 要爬取的开始URL地址,注意:如果通过域名创建蜘蛛程序,创建完毕之后需要修改start_urls
    start_urls = ["https://movie.douban.com/top250"]

    """
    上诉的三个数据都是可以修改的
    """

    # 是一个函数生成器,处理响应对象
    # 工作流程:引擎将产生的item给到管道,将产生的请求给调度器
    # response:标记类型,为了更好的使用对应的方法或属性
    def parse(self, response: HtmlResponse):
        # 在响应类中也封装了解析方式,可以使用xpath,也可以使用css,注意可以直接解析到文本
        # extract():把定位到的信息全部提取出来,存储到列表中
        # extract_first():把定位到的信息中的第一个提取出来

        # xpath
        titles = response.xpath('//div[@class="hd"]/a/span[1]/text()').extract()

        # css,注意: ::text这是scrapy特有的写法,标识获取css标签中的内容
        scores = response.css('.rating_num::text').extract()

        # 构造Item对象,并赋值
        for title, score in zip(titles, scores):
            item = MovieItem()
            # 给字段赋值
            item['title'] = title
            item['score'] = score

            # 产出item对象
            yield item
settings.py
# 设置请求头
DEFAULT_REQUEST_HEADERS = {
    "User-Agent": "Mozilla/5.0 (Windows NT 10.0; Win64; x64) AppleWebKit/537.36 (KHTML, like Gecko) Chrome/120.0.0.0 Safari/537.36"
}
4.2 运行程序
在Terminal中,确保路径是否在当前项目下(如果不在则需要切换路径),执行scrapy crawl douban命令

5、程序优化
5.1 在蜘蛛程序中衍生出新的请求
请求多页数据,会衍生出新的请求
douban.py
import scrapy
from scrapy.http import HtmlResponse
from ScrapyProject.items import MovieItem
from scrapy import Request

class DoubanSpider(scrapy.Spider):
    # 蜘蛛程序的标记,不同的支柱程序,这个名称是不一样的
    name = "douban"
    # 允许请求的域名,要请求的域名都这设置在这里
    allowed_domains = ["movie.douban.com"]
    # 要爬取的开始URL地址,注意:如果通过域名创建蜘蛛程序,创建完毕之后需要修改start_urls
    start_urls = ["https://movie.douban.com/top250"]

    """
    上诉的三个数据都是可以修改的
    """

    # 是一个函数生成器,处理响应对象
    # 工作流程:引擎将产生的item给到管道,将产生的请求给调度器
    # response:标记类型,为了更好的使用对应的方法或属性
    def parse(self, response: HtmlResponse):
        # 在响应类中也封装了解析方式,可以使用xpath,也可以使用css,注意可以直接解析到文本
        # extract():把定位到的信息全部提取出来,存储到列表中
        # extract_first():把定位到的信息中的第一个提取出来

        # xpath
        titles = response.xpath('//div[@class="hd"]/a/span[1]/text()').extract()

        # css,注意: ::text这是scrapy特有的写法,标识获取css标签中的内容
        scores = response.css('.rating_num::text').extract()

        # 构造Item对象,并赋值
        for title, score in zip(titles, scores):
            item = MovieItem()
            # 给字段赋值
            item['title'] = title
            item['score'] = score

            # 产出item对象
            yield item

        # 获取下一页的请求,路径定位不到内容表示没有下一页请求了
        # Xpath定位的结果是一个列表,如果没有定位到则返回一个空列表
        # 方式一:extract()返回的是一个列表
        # next_url = response.xpath("//span[@class='next']/a/@href").extract()
        # if len(next_url) != 0:
        #     # 拼接url
        #     url = self.start_urls[0] + next_url[0]

        # 方式二:get()返回一个字符串
        next_url = response.xpath("//span[@class='next']/a/@href").get()
        if next_url:
            url = self.start_urls[0] + next_url

            # 在蜘蛛程序中,衍生出新的请求,需要创建Request对象完成
            yield Request(url=url)
            """
            参数说明
            url:表示请求对象封装的请求地址是什么
            callback:需要赋值一个函数,被称为回调函数,用来接受响应内容的
                      如果callback没有被赋值,则接受所有请求的响应内容的函数是parse
                      如果给callback赋值了新的函数,则接受所有的响应内容的函数就是新赋值的函数
            """
5.2 通过管道实现数据持久化存储
5.2.1 说明
数据存储,其实就是我们常说的数据持久化,爬虫爬下来的数据终究是需要保存的。我们有这么两种方案进行数据的存储
-
方式一:使用Scrapy的Exporter组件利用指定的命令进行数据导出
- Scrapy提供了这样一条命令进行数据的存储:
scrapy crawl 爬虫名字 -o 文件名.后缀名或者scrapy crawl 爬虫名字 --output 文件名.后缀名 - 例如:在Terminal中输入
scrapy crawl douban -o data.csv,程序执行完以后就可以看到目录下出现了data.csv文件,里面包含了你想要的数据 - 但是,scrapy只提供了对
json、jsonlines、jsonl、jl、csv、xml、marshal、pickle这八种文件格式的支持,所以如果有其他需求,请看第二种方式
- Scrapy提供了这样一条命令进行数据的存储:
-
方式二:自建管道,进行文件存储代码的编写
- 通过自建管道Pipeline对数据进行存储,前文我们在Scrapy流程图中说过,管道就是为了处理爬虫从网页中抽离出的实体而存在的,数据转化为Item以后,会传递到Item Pipeline做进一步的处理,比如:清洗数据、数据去重、数据存储等
在pipeline.py文件中编写存储数据的代码,该文件中原本是这些内容:
# Define your item pipelines here
#
# Don't forget to add your pipeline to the ITEM_PIPELINES setting
# See: https://docs.scrapy.org/en/latest/topics/item-pipeline.html

# useful for handling different item types with a single interface
from itemadapter import ItemAdapter

class ScrapyprojectPipeline:
    def process_item(self, item, spider):
return itemScrapy官方文章中介绍说,每个项目管道组件都是一个类,这个类中存在四个方法,分别是process_item、open_spider、close_spider、from_crawler,这些方法并不是必须都要写的,选择合适的情况写入即可。那么这四个方法分别有什么作用呢?
-
open_spider(self, spider):运行爬虫时调用此方法,spider参数会自动指向目前运行的爬虫。 -
close_spider(self, spider):关闭爬虫时调用此方法,spider参数会自动指向运行结束的爬虫。 -
process_item(self, item, spider):爬虫执行时进一步处理数据的方法,item参数代表的就是item.py文件中Item类中的数据,spider参数指向当前爬虫。 -
from_crawler(cls, crawler):这个方法是个类方法,可用于爬虫开始执行时数据处理的一些初始化参数。
5.2.2 使用
使用管道的时候,一定要在settings.py文件中打开管道注释
注意:
- 如果手动更改过
pipelines中的类名,则此处的路径也需要更改,导入相对路径即可 - 数字300表示管道的优先级,数字在0~1000之间,值越小,表示优先级越高
第一步:settings.py
# 开启管道
ITEM_PIPELINES = {
   "ScrapyProject.pipelines.ScrapyprojectPipeline": 300,
}
第二步:pipelines.py
# Define your item pipelines here
#
# Don't forget to add your pipeline to the ITEM_PIPELINES setting
# See: https://docs.scrapy.org/en/latest/topics/item-pipeline.html

# useful for handling different item types with a single interface
from itemadapter import ItemAdapter
import openpyxl

# 这里的类名是可以修改的,比如ItemPipeline
class ScrapyprojectPipeline:
    # 1.蜘蛛程序被启动时会自动被调用,作用:建立和工作簿之间的联系
    def open_spider(self, spider):
        print(f'========蜘蛛程序{spider.name}被启动=======')
        if spider.name == 'douban':
            # 问题:为什么要把工作簿和工作表与self绑定?
            # 答:为了让这两个变量可以贯穿于整个类中,self代表的是当前类的对象
            # 工作簿
            self.workbook = openpyxl.Workbook()
            # 工作表
            self.sheet = self.workbook['Sheet']
            # 添加表头
            self.sheet.append(['评分', '标题'])

    # 2.处理数据
    def process_item(self, item, spider):
        """
        :param item: 蜘蛛程序,解析内容的函数产出的Item对象
        :param spider: 对象来自于哪个蜘蛛程序
        :return:
        """
        # print('-----',spider)
        # 通过判断蜘蛛程序的名称,会自动获取到指定蜘蛛程序的item,因为一个scrapy工程可能会有多个蜘蛛程序
        # 在该函数中可以对不同的蜘蛛程序做出处理
        if spider.name == 'douban':
            print(item, '~~~~~~~~~~~~')

            # 需求:将解析结果存储到excel文件中,则需要实现open_spider和close_spider
            self.sheet.append([item['score'], item['title']])

        return item

    # 3.蜘蛛程序结束时自动调用
    def close_spider(self, spider):
        print(f'========蜘蛛程序{spider.name}结束了=======')
        # 切断和工作簿的联系
        if spider.name == 'douban':
            # 保存工作簿
            self.workbook.save('top250.xlsx')
5.3 处理下载中间件拦截请求
-
需求:获取英雄信息(动态数据):https://101.qq.com/#/hero
-
第一步:创建蜘蛛程序,
scrapy genspider hero 101.qq.com -
第二步:修改
hero.py代码- 通过查看响应体,发现单纯的scrapy无法获取动态数据
- 如果想要通过浏览器上的网址获取动态数据,就只有selenium能实现
- 问题:怎么这是使用selenium发送请求?
- 答:拦截请求————>下载中间件
import scrapy from scrapy.http import HtmlResponse class HeroSpider(scrapy.Spider): name = "hero" allowed_domains = ["101.qq.com"] start_urls = ["https://101.qq.com/#/hero"] def parse(self, response:HtmlResponse): # print(response.text) # 字符串格式的响应体 ''' 通过查看响应体,发现单纯的scrapy无法获取动态数据 如果想要通过浏览器上的网址获取动态数据,就只有selenium能实现 怎么这是使用selenium发送请求? 拦截请求-----》下载中间件 注意:使用中间件则要在settings.py中打开设置 DOWNLOADER_MIDDLEWARES = { "ScrapyProject.middlewares.ScrapyprojectDownloaderMiddleware": 543, } ''' print(response.text) -
第三步:在
settings.py中打开中间件DOWNLOADER_MIDDLEWARES = { "ScrapyProject.middlewares.ScrapyprojectDownloaderMiddleware": 543, } -
第四步:修改
middlewares.py,封装一个类,使用selenium处理请求# Define here the models for your spider middleware # # See documentation in: # https://docs.scrapy.org/en/latest/topics/spider-middleware.html import time from scrapy import signals # useful for handling different item types with a single interface from itemadapter import is_item, ItemAdapter from selenium.webdriver import Chrome from scrapy.http import HtmlResponse class ScrapyprojectSpiderMiddleware: # Not all methods need to be defined. If a method is not defined, # scrapy acts as if the spider middleware does not modify the # passed objects. @classmethod def from_crawler(cls, crawler): # This method is used by Scrapy to create your spiders. s = cls() crawler.signals.connect(s.spider_opened, signal=signals.spider_opened) return s def process_spider_input(self, response, spider): # Called for each response that goes through the spider # middleware and into the spider. # Should return None or raise an exception. return None def process_spider_output(self, response, result, spider): # Called with the results returned from the Spider, after # it has processed the response. # Must return an iterable of Request, or item objects. for i in result: yield i def process_spider_exception(self, response, exception, spider): # Called when a spider or process_spider_input() method # (from other spider middleware) raises an exception. # Should return either None or an iterable of Request or item objects. pass def process_start_requests(self, start_requests, spider): # Called with the start requests of the spider, and works # similarly to the process_spider_output() method, except # that it doesn’t have a response associated. # Must return only requests (not items). for r in start_requests: yield r def spider_opened(self, spider): spider.logger.info("Spider opened: %s" % spider.name) # 封装一个类,使用selenium处理请求 class SeleniumRequest(): # 构造函数,创建对象的时候自动调用的函数 def __init__(self, url): self.browser = Chrome() self.browser.get(url) time.sleep(2) def get_response(self): return self.browser.page_source # 析构函数,对象被释放的时候,切断和浏览器之间的联系 def __del__(self): self.browser.close() class ScrapyprojectDownloaderMiddleware: # Not all methods need to be defined. If a method is not defined, # scrapy acts as if the downloader middleware does not modify the # passed objects. @classmethod def from_crawler(cls, crawler): # This method is used by Scrapy to create your spiders. s = cls() crawler.signals.connect(s.spider_opened, signal=signals.spider_opened) return s # 拦截请求,对请求进行处理 # request:接受到的是请求对象的相关信息 # spider:请求来自哪个蜘蛛程序 def process_request(self, request, spider): # Called for each request that goes through the downloader # middleware. # Must either: # - return None: continue processing this request # - or return a Response object # - or return a Request object # - or raise IgnoreRequest: process_exception() methods of # installed downloader middleware will be called if spider.name == "hero": print("====拦截请求====", request) # 拦截scrapy的请求,让selenium发起请求 # 重新获取URL url = request.url # 创建selenium类的对象,传递请求的地址 sele_obj = SeleniumRequest(url=url) reponse = sele_obj.get_response() # 结果是字符串 """ 将上诉结果封装成请求对象返回 url:请求的网址 body:设置的响应体,需要设置字节数据(需要将字符串编码为字节数据) request:请求 encoding:编码格式 """ return HtmlResponse(url=url, body=reponse.encode("utf-8"), request=request, encoding="utf-8") def process_response(self, request, response, spider): # Called with the response returned from the downloader. # Must either; # - return a Response object # - return a Request object # - or raise IgnoreRequest return response def process_exception(self, request, exception, spider): # Called when a download handler or a process_request() # (from other downloader middleware) raises an exception. # Must either: # - return None: continue processing this exception # - return a Response object: stops process_exception() chain # - return a Request object: stops process_exception() chain pass def spider_opened(self, spider): spider.logger.info("Spider opened: %s" % spider.name)
5.4 根据接口获取动态数据
因为用selenium破坏了scrapy框架的异步处理数据的能力,所以对于动态数据,可以通过接口获取
-
第一步:创建蜘蛛程序,
scrapy genspider varhero 101.qq.com -
第二步:varhero.py
import scrapy from scrapy.http import TextResponse # 是HtmlResponse的父类 from scrapy import Request from ScrapyProject.items import LOLHeroItem class VarheroSpider(scrapy.Spider): name = "varhero" allowed_domains = ["101.qq.com","game.gtimg.cn"] start_urls = ["https://game.gtimg.cn/images/lol/act/img/js/heroList/hero_list.js?ts=2835153"] def parse(self, response:TextResponse): heros_list = response.json().get('hero') for hero_dict in heros_list: # id hero_id = hero_dict.get('heroId') hero_detail_url = f'https://game.gtimg.cn/images/lol/act/img/js/hero/{hero_id}.js' # 产生新的请求 yield Request(url=hero_detail_url,callback=self.detail_parse) # 解析详情页的数据 def detail_parse(self,response:TextResponse): hero = response.json().get('hero') # 英雄名称 hero_name = hero.get('name') # 角色 hero_roles = '|'.join(hero.get('roles')) # 构建Item对象 item = LOLHeroItem() item['name'] = hero_name item['roles'] = hero_roles yield item -
第三步:items.py
class LOLHeroItem(scrapy.Item): name = scrapy.Field() roles = scrapy.Field() -
第四步:运行程序,
scrapy crawl varhero


暂无评论内容